Address poisoning is one of the most effective low-effort attacks in crypto because it exploits speed, not code vulnerabilities. Attackers send tiny transfers or token spam from lookalike addresses so their wallet appears in your history. Later, when you copy an address from recent transactions, you might grab the attacker’s address instead of the real one. One rushed send is enough to lose funds permanently.
The defense is not a new app. It is a verification workflow: a repeatable sequence you run every time, especially when you are tired, rushed, or under pressure. This guide gives you that workflow in plain steps.
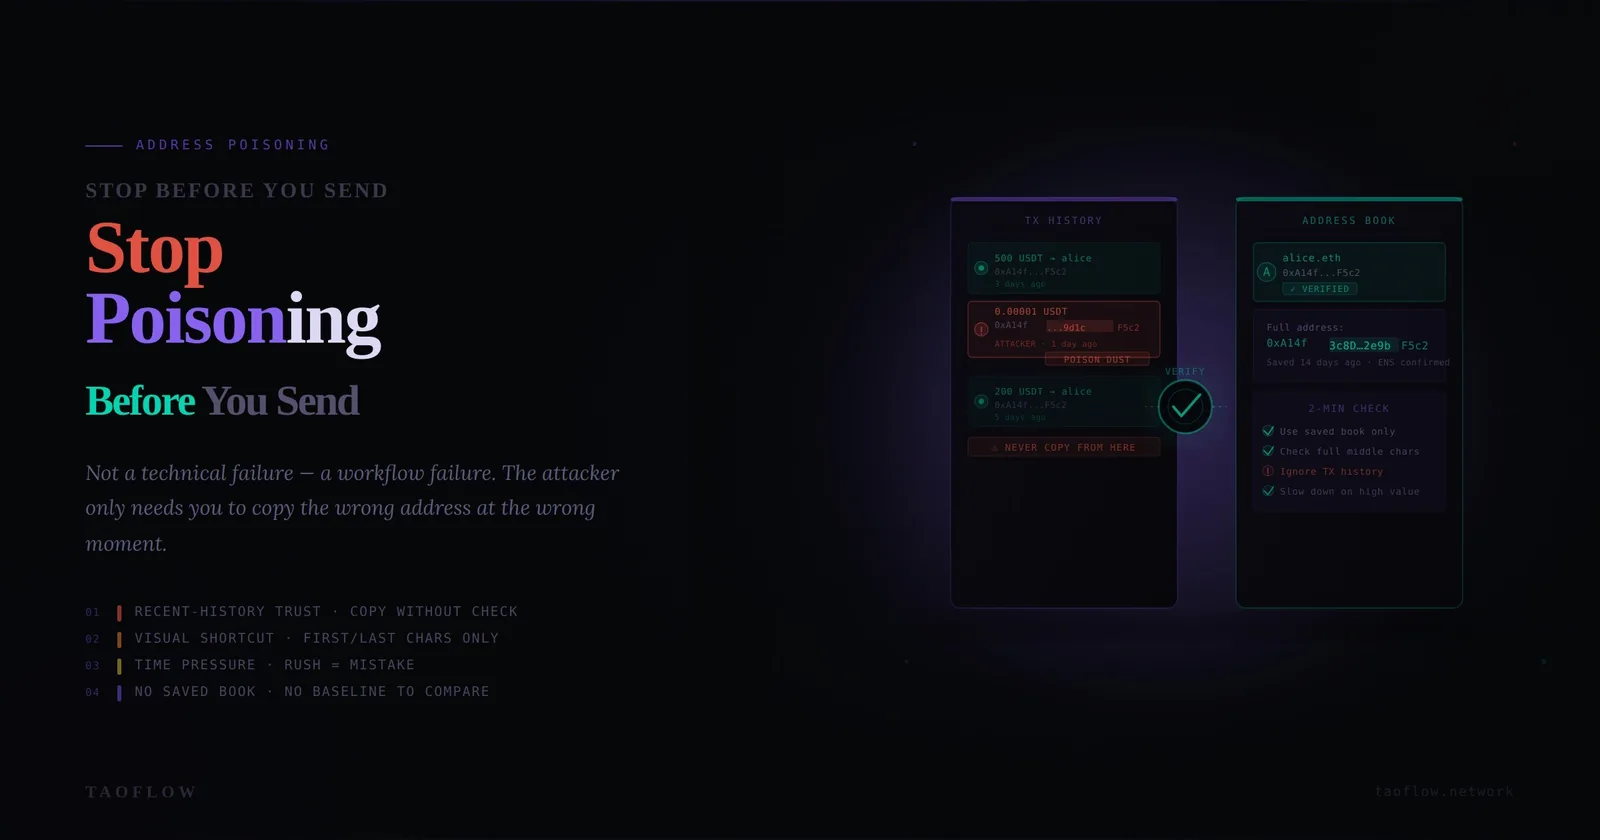
Why address poisoning keeps working
Most losses happen because normal behavior under time pressure collides with deceptive wallet history. Common failure modes:
- Copying from recent history instead of a trusted address book
- Checking only first/last 4 characters, which attackers can mimic
- Skipping network and token checks
- Sending full amount first without a test transfer
- Confirming from mobile notifications while multitasking
Address poisoning is a process attack. So your defense must be process-first too.
Threat model in 60 seconds
Assume the following are true:
- Your transaction history is hostile by default.
- Any address shown in a token transfer log can be attacker-controlled.
- A visually similar address is still a completely different destination.
- If you rely on memory or speed, you will eventually fail.
With this model, your goal is simple: only send to addresses that pass independent verification.
The 8-step pre-send verification workflow
Use this checklist before every transfer, regardless of amount.
Step 1) Start from a trusted source, never from recent history
Good sources:
- Your maintained address book entry with owner label
- A signed internal payment request (for teams)
- An out-of-band confirmed address (voice or secure chat confirmation)
Bad sources:
- “Last used” entries
- Random inbound transfer records
- Clipboard text of unknown origin
Rule: if you cannot identify where the address originally came from, do not send.
Step 2) Verify chain + asset + destination type together
Many mistakes happen before checking the address itself. Confirm:
- Correct chain (Ethereum, BNB Chain, Solana, etc.)
- Correct asset format (native coin, ERC-20, SPL token)
- Correct destination type (exchange deposit, self-custody wallet, contract)
An address can be valid format-wise but wrong for your intended route.
Step 3) Full-string verification (not partial)
Do not rely on first/last characters. Compare full address string using one of these methods:
- Side-by-side compare in two windows
- QR scan from trusted source to avoid clipboard risk
- Character-group verification (e.g., chunks of 6–8 chars)
For high-value sends, require two humans to independently verify the full string.
Step 4) Use an allowlist with owner context
An address alone is not enough. Store:
- Owner/entity name
- Chain and token scope
- Purpose (treasury, payroll, vendor, exchange hot wallet)
- Date and channel of original verification
If any context is missing, treat it as unverified until re-approved.
Step 5) Simulate intent before signing
Before final confirmation, restate the transaction in plain language:
“I am sending [amount] [token] on [chain] to [owner label], address [full address], for [purpose].”
If your wallet or tooling supports simulation or preview, check it. If the preview data does not match your intent, stop immediately. A light TaoFlow-style routine is to make this spoken/read-back step mandatory in your team SOP.
Step 6) Test-send policy by risk tier
Adopt fixed tiers:
- Low value: optional test send
- Medium value: mandatory small test send
- High value: test send + waiting period + second approver
A test send should be large enough to detect wrong destination behavior but small enough to be disposable.
Step 7) Delay and re-check under pressure
Urgency is attacker fuel. Add a forced pause:
- 30 seconds for routine sends
- 5 minutes for first-time destination
- 15 minutes for large transfers or unusual requests
After pause, repeat Step 3 and Step 5. If someone pushes “send now,” escalate verification instead of speeding up.
Step 8) Post-send confirmation and journaling
After sending:
- Confirm transaction hash and recipient on explorer
- Record what source was used for the address
- Note any anomalies (odd token spam, unfamiliar inbound transactions)
This creates auditability and improves future detection.
Personal wallet setup to reduce poisoning risk
Individuals can cut risk dramatically with three changes:
- Use a curated address book and refuse copy-from-history behavior.
- Separate wallets by function (daily use vs long-term storage vs testing).
- Use hardware signing for meaningful amounts so you review details in a deliberate environment.
Also clean your routine:
- Never trust token logos or wallet nicknames from unknown sources
- Ignore tiny unsolicited transfers
- Turn off notification-driven sending habits
Team controls that actually work
For teams, policy beats heroics. Implement:
- Dual approval for new destination addresses
- Four-eyes check for transfers over threshold
- Signed payment requests with immutable fields (chain, token, full address, amount cap)
- Weekly allowlist review and stale address removal
- Incident drill for “wrong-address send” at least quarterly
Most importantly, ban “DM-only destination updates.” Any address change must be confirmed in a separate channel and logged.
Red flags: stop and escalate immediately
Pause all sends if you see any of these:
- New address appears that looks very similar to a known one
- Requestor insists on speed, secrecy, or bypassing normal flow
- Exchange deposit address changed unexpectedly
- Token transfer history suddenly filled with tiny unknown transactions
- Team member asks to “just reuse last one” for convenience
Red flags do not mean panic. They mean switch from transaction mode to verification mode.
If you already sent to a poisoned address
Move quickly, but methodically:
- Document tx hash, chain, timestamp, and mistaken address.
- Notify counterparties and internal stakeholders immediately.
- If destination is exchange-controlled, contact exchange support with full evidence.
- Freeze similar pending payments until root cause is identified.
- Update SOP and training based on the exact failure step.
Do not hide near-misses. Near-misses are your best training data.
A printable “send gate” checklist
Use this mini gate before every transfer:
- [ ] Address came from trusted source (not history)
- [ ] Chain and token match intent
- [ ] Full address string verified
- [ ] Owner context matches allowlist
- [ ] Purpose read-back completed
- [ ] Test-send policy applied
- [ ] Pause timer completed
- [ ] Final confirmation done on explorer
If any box is unchecked, do not send.
Final takeaway
Address poisoning is not defeated by luck or memory. It is defeated by disciplined repetition. Build one workflow, run it every time, and make exceptions harder than compliance. If your process still depends on speed and confidence, it is fragile. If it depends on verification and traceability, it is resilient.