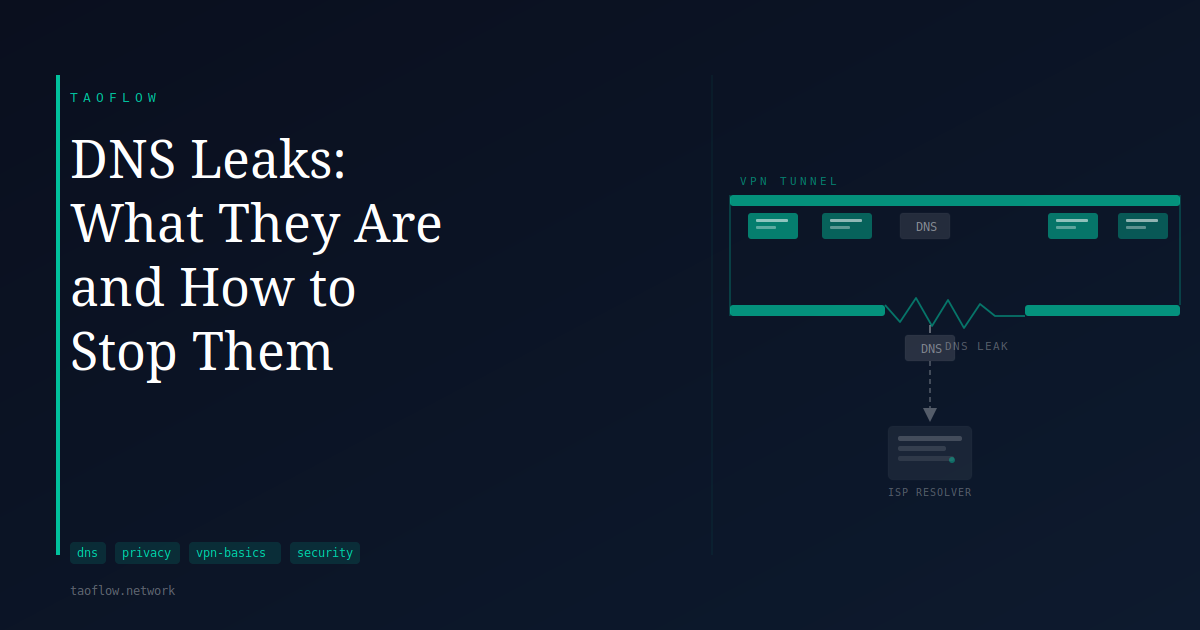
You connect to your VPN, the tunnel is up, and you assume your traffic is private. But there is one category of request that can slip outside the tunnel without any warning: DNS queries. When that happens it is called a DNS leak, and it means your internet service provider can still see every domain you visit, even while your VPN is running.
What DNS is and why it matters for privacy
DNS stands for Domain Name System. When you type a website address into your browser, your device sends a query to a DNS resolver — a server that translates the domain name into an IP address your device can connect to. Your ISP typically provides a DNS resolver by default, and that resolver sees every domain you query.
A VPN is supposed to route those queries through the encrypted tunnel to the VPN provider's DNS resolver or a third-party one you have configured. The result: your ISP sees encrypted traffic going to the VPN server, not a list of domains.
When that routing fails and queries go to your ISP's resolver instead, you have a DNS leak.
How a DNS leak happens
A DNS leak is not a single failure — several different situations can cause it.
Your operating system may have a DNS resolver configured that it continues using after the VPN connects, simply ignoring the VPN's DNS settings. Some VPN clients set up the tunnel correctly but do not enforce DNS routing, leaving the OS free to use whatever resolver it had before.
On Windows, a feature called Smart Multi-Homed Name Resolution sends DNS queries to multiple resolvers simultaneously — including your ISP's — and uses whichever responds first. A WireGuard or OpenVPN tunnel running alongside this feature may find that the ISP resolver answers first, before the tunneled resolver does.
IPv6 is another common source. If your VPN only tunnels IPv4 traffic, IPv6 DNS queries travel outside the tunnel on their own path. Networks that support IPv6 will route those queries directly to your ISP's IPv6 resolver.
The result in each case looks the same: your VPN appears connected, your browsing traffic is encrypted, but the domain-level record of your activity continues to reach your ISP.
How to check for a DNS leak
Testing for a DNS leak takes a few minutes and requires no technical setup. Several websites perform this test by asking your browser to make DNS requests, then reporting which resolver answered them.
Connect to your VPN, visit a DNS leak test site, and run the extended test. The result will show the name and operator of the resolver that responded. If it shows your ISP's network rather than your VPN provider or a resolver you configured, your DNS queries are leaking.
Run the test on both IPv4 and IPv6 if your network supports both. A test that only checks one may miss a leak on the other.
How to stop DNS leaks
Check your WireGuard config file. A WireGuard .conf file includes an [Interface] section. Look for a DNS = line. If it is present, WireGuard will route DNS queries through the tunnel to that resolver. If it is missing, your OS may use its default resolver instead. You can add the line manually: DNS = 1.1.1.1 or DNS = 9.9.9.9 are common choices.
Set DNS manually at the OS level. Your operating system's network settings let you specify a DNS resolver independently of what the VPN sets. Changing this to a resolver not operated by your ISP prevents leaks if the VPN client does not enforce DNS routing. Note that browser-level DNS-over-HTTPS settings apply only to browser traffic and do not cover other apps.
Disable Smart Multi-Homed Name Resolution on Windows. This setting is in Group Policy under Computer Configuration → Administrative Templates → Network → DNS Client. Setting "Turn off smart multi-homed name resolution" to Enabled stops Windows from sending queries to multiple resolvers simultaneously.
Handle IPv6 explicitly. If your VPN client does not route IPv6 traffic, disable IPv6 on the network adapter you use while connected to the VPN. Your operating system's network adapter settings or your router's settings can do this. Some VPN clients include an option to block IPv6 leaks directly.
What this means for you
DNS leaks are easy to overlook because the VPN connection itself looks normal — your IP address has changed, your traffic is encrypted — but the domain-level log of your browsing continues to reach your ISP. The gap between what you expect and what is actually happening is invisible unless you test for it.
If you received a WireGuard config file from a VPN service, confirm that it includes a DNS = line. If you are not sure which resolver to use, both 1.1.1.1 (operated by Cloudflare) and 9.9.9.9 (operated by Quad9) are widely used alternatives to ISP resolvers, with public privacy policies.
Testing after initial setup and again after OS updates or network changes is a low-effort habit. Network configurations change, and a setup that was leak-free before an update may behave differently afterward.
A DNS leak does not mean your VPN has failed in every respect, but it does mean one of its main privacy benefits is not working as intended. Testing takes a few minutes, the fixes are straightforward, and the difference between a leaking and a non-leaking setup is meaningful.